Quick Calibration – Using Auto Bore Sight to Align Your ShotTracker
For ShotTracker to provide accurate feedback, it must be properly aligned with your shotgun’s aim. This alignment process, known as bore sighting, ensures the device’s camera and sensors are looking where your barrel is pointing. Traditionally, bore sighting could be a manual, time-consuming task. However, ShotTracker offers an Auto Bore Sight feature that makes calibration fast and easy. In this article, we’ll discuss why alignment matters and walk through using Auto Bore Sight so you can start your training session with confidence that your ShotTracker is on target.
The Importance of Alignment
When you mount ShotTracker on your shotgun, it needs to know exactly where the gun is aiming in order to accurately map your shots. If the device is even slightly off-kilter, the data on shot placement and angles could be skewed. For example, imagine your ShotTracker is tilted or not centered – it might report that you’re consistently shooting low and right, when in reality the device itself is misaligned. Proper bore sighting prevents this kind of error. It effectively “zeros” the ShotTracker to your shotgun, much like sighting in a scope on a rifle. Taking a few minutes to align at the start will save you from confusion later when analyzing shots. In short, alignment ensures trust in the feedback – when ShotTracker says you were behind a target, it’s telling the truth, not an artifact of being off-center on the barrel.
What is Auto Bore Sight?
Auto Bore Sight is a built-in ShotTracker feature designed to streamline the alignment process. Traditionally, to bore-sight a shotgun for a device or optic, one might set up a target (often with a distinctive aim point like a bullseye or even a clay pigeon on a cardboard) and adjust the device manually until it matched the barrel’s aim. Auto Bore Sight automates that. Using the ShotTracker’s camera, the system can detect a reference object and calibrate itself. In practical terms, it works like this: you’ll set up a target (the ShotTracker manual suggests something like a clay target image at a known distance). Then, via the app, activate Auto Bore Sight mode. The ShotTracker will “look” at the target, and within a few seconds, it will adjust its internal settings to align with the shotgun’s bore (hence the term bore sighting). When it beeps or signals completion, the device is telling you, “I’m lined up and ready.”
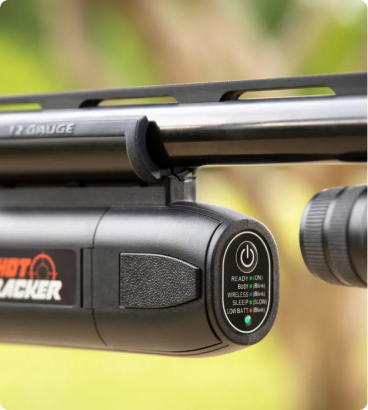
Modern tools like Auto Bore Sight simplify setup – with one button press, ShotTracker can calibrate itself to your shotgun, aligning the device’s view perfectly with your barrel.
Steps to Use Auto Bore Sight
- Set Up a Boresight Target: Ideally, do this at the range before you start shooting. Place a target about 16 yards out (15 meters or so) – common practice is to use a paper with a clay target image or a big dot in the center. The distance doesn’t have to be exact, but ShotTracker’s Auto Bore Sight expects a target roughly at typical shotgun engagement range to focus on.
- Mount ShotTracker and Open the App: Attach the ShotTracker securely to your barrel (if you haven’t already). Open the ClayTracker app on your phone or tablet and navigate to the profile of the shotgun you’re using. There will be an option for “Boresight” in the settings for that profile.
- Activate Auto Boresight Mode: In the app, select Auto Boresight. The device’s camera will turn on. At this point, the app usually prompts you to stabilize the shotgun and aim at the boresight target. Do exactly that – hold the shotgun as steady as possible, aimed so your bead (front sight) is on the center of the target. It helps to use a shooting rest or have someone assist to keep it still.
- Let the Device Calibrate: When ready, press the Begin button in the app. ShotTracker will typically give a countdown (around 5 seconds) – during this time, keep the gun very still on target. After the timer, the device will capture the view. It will recognize the reference target (say that orange clay circle) and automatically calculate the necessary adjustments. You might hear a beep indicating success. The app will show a confirmation, often displaying the target image with a reticle or indicator where it thinks the aim point is.
- Verify and Save: Check the app’s display – it might show something like a red dot on the target image. Ensure that dot is indeed on the center of the target. If it looks correct and the distance reading (if provided) is sensible (within a yard or so of the actual distance), then hit “Confirm” or “Save” to lock in the boresight. If it was off (perhaps you moved or the device didn’t catch the image correctly), you can redo the process.
And that’s it – Auto Bore Sight will now adjust the ShotTracker’s calculations so that all the subsequent shots are measured from that aligned position.
Advantages of Auto vs. Manual Bore sighting
The automated process above has a few clear advantages:
- Speed: It takes mere seconds for the device to self-calibrate, whereas manually adjusting could involve multiple test shots and tweaks.
- No Guesswork: The software is detecting the target and doing the math. This reduces user error; you’re not eyeballing alignment as you would be with manual methods.
- Field Friendly: Because no actual firing is required (you didn’t have to shoot at the target, just aim), you can even do this at home or before live fire commences. That saves ammo and allows quiet setup – useful for coaches prepping multiple units for a team.
Manual bore sighting is still an option (and the app has a mode for it, where you input adjustments), but most users will find auto mode far more convenient. The only time manual might be needed is if the automatic feature has trouble, perhaps due to unusual lighting or target issues.
Tips for Best Results
Even with Auto Bore Sight’s simplicity, a few tips can help:
- Use a clear, contrasting target: It is best the use the Auto-Boresight Target included with your ShotTracker Kit. As an alternative an orange clay against a plain background (like sky or a white paper) works great. Avoid aiming at something too busy or at long distances where the device might not distinguish the target well.
- Keep the shotgun steady: Any movement during the calibration can throw it off. Using a rest or sandbags can make a big difference in stability.
- Check alignment periodically: If you’re shooting extensively, maybe verify the bore sight at the end of the day or before the next session. The mount should hold zero, but it’s good practice to ensure nothing has shifted (especially if the device was removed and reattached).
- One profile per shotgun: If you use ShotTracker on different guns, set up profiles and bore-sight each. The app can store multiple profiles and their boresight data, so you don’t need to recalibrate each time you swap guns – just select the correct profile.
Conclusion
Auto Bore Sight is a powerful feature that gets your ShotTracker calibration done quickly, allowing you to focus on training rather than setup. By ensuring the device’s “eye” matches your barrel’s aim, you can trust the real-time feedback on every shot. A properly aligned ShotTracker means the data you see – whether it’s your swing path or where your pattern went – is accurate and reliable. So, take those few moments to auto bore sight at the start; it’s a small step that guarantees your high-tech training session begins on target from the very first shot.
For more information on Auto Bore Sighting , click HERE to watch a video on how to use the feature.